 I almost didn’t want to do anything for Halloween, because I’m not the biggest fan. But than I made a 2 layered pumpkin birthday cake for my lovely pig Oliver (it was his 2nd birthday!) and it was so delicious, that I had to make it into a recipe. Around this time of the year pumpkins are everywhere! Go into any supermarket and you will see big boxes with huge pumpkins everywhere and because I love pumpkins so much, I’m always tempted to buy one (or 2..), every time I step into a supermarket. Most people buy them to carve them and make them into pieces of art. Sometimes they don’t even realise what tasty things you can make with them and how delicious they are. So that is why I thought I will buy 1 of those pumpkins and I will show you 3 recipes you can make out of that 1 pumpkin. If you want to carve your pumpkin, you can still make 2 out of 3 recipes. As I said before, there will be the pumpkin cake (and only this recipe is worth buying a pumpkin), but I will also tell you how to roast the pumpkin seeds (sooo addictive) and how to make a big batch of the creamiest pumpkin soup ever (unless you carve your pumpkin, then you won’t have enough for soup). You can also follow my pumpkin soup recipe Pumpi if you don’t like it too creamy. So there we go..
You will need:
1 big Pumpkin (about 4kg)
 PUMPKIN CAKE
Serves: 8
Dry Ingredients:
2 cups flour
1 cup brown sugar
1 tsp baking powder
1/2 tsp baking soda
1 tsp cinnamon
1/2 tsp ginger
pinch of salt
Wet Ingredients:
1 tsp vanilla extract
2 cups scraped pumpkin *
1/2 cup oat milk
1/4 cup vegetable oil
1/2 tbs lemon (juice)
Extra:
1 cup scraped pumpkin*
2 tbs brown sugar
3 tbs pumpkin seeds
3/4 cup raisins
-Preheat the oven at 180C.
-Slice 1/4 off the pumpkin, remove the seeds (keep them for later) and the pulp. Scrape 3 cups of pumpkin.*
-Put 2 cups of the scraped pumpkin + the rest of the wet ingredients in a blender and blend until smooth.
-Put all the dry ingredients in a bowl and mix it up.
-Gently pour the wet ingredients into the dry ingredients. Preferably use an electric mixer to make it a smooth cake batter.
-Add the pumpkin seeds and the raisins to the batter and gently mix them in.
-Grease a baking tin and pour the cake batter in the tin.
-Squeeze as much juice as you can from the last cup of scraped pumpkin (put the pumpkin in kitchen roll, fold both hands around it and squeeze). Then mix in 2 tbs brown sugar and divide this over the top of the cake batter. Use your fingers to push it down a little bit.
-Put the tin in the oven for about 45-50 min.
*See picture: After taking the seeds out, use a spoon to scrape the inside of the pumpkin. It basically looks like grated pumpkin. You can also actually use a grater or pulse it in the kitchen machine until you’ve got the same.
 ROASTED PUMPKIN SEEDS
Makes: 1 cup
all the seeds
1/2 tbs coconut oil (soft)
1 tbs nutritional yeast
1 tsp bouillon powder
salt/pepper (to taste)
-Preheat the oven at 220C.
-Try to take out as much pulp as you can.
-Rinse the seeds to get rid of more pulp.
-Cook the seeds in boiling water for 5 min.
-Rinse the seeds to get rid of the last pulp and dry them with some kitchen roll.
-Mix in the coconut oil, nutritional yeast, the bouillon powder and the salt/pepper.
-Put some baking paper on a flat baking tray and divide the seeds. Spread them out as much as you can.
-Put the tray in the oven for 5 min. Then mix it all up and put it in the oven for another 5-7 min. Keep checking, because you don’t want hem to burn. They are perfect when they just start to change colour a little bit.
-Let them cool down and enjoy the crispiness.
 PUMPKIN SOUP
Serves: 6-8
the rest of the pumpkin (you can also add the pulp, chopped)
3 medium red onions (chopped)
10 big carrots (chopped)
4-5 cloves of garlic
1 L water
1/3 cup bouillon powder
1/3 cup nutritional yeast
1 tsp turmeric
salt/pepper (to taste)
Cream:
200 gram tofu
1 cup cashew nuts
1 can coconut milk
1 cup almond milk
Serving:
-1-2 tbs (tofu-coconut) cream
-1-2 tbs roasted pumpkin seeds
-Preheat the oven at 220C.
-Put all the pumpkin, the onion, the carrots and the garlic in a big oven tray (you might need 2!), sprinkle some salt on top and put the trays in the oven for 30-40 min.
-In the meantime make the cream: put the tofu, cashew nuts, coconut milk and the almond milk in the bender and blend until completely smooth (0 crumbs!). Keep a little bit separate, to use as a topping.
-Take the vegetables out of the oven and blend them with some water, the bouillon, nutritional yeast and the turmeric until smooth.
-Put it all in a big pan and mix in the cream.
-Add salt/pepper to taste.
-Serve with some extra cream and some roasted pumpkin seeds.
Are you excited to get a pumpkin now? Which recipe are you most excited about? Please show me your results on Instagram. You can do this by tagging me or by using #planetmanel. Thank you! X

 At any time in my life, if you’d ask me what is my favourite sandwich, I would tell you it’s ‘Broodje Gezond’ (direct translate: ‘bread healthy’). Even though the name suggest it’s healthy, it definitely isn’t. However, I ate many of them. After school, going to the cafe to get one and whenever the option was there, that is what I’d order. Always! I also made a home made version many may times. I love it! When I went vegan, I didn’t eat it anymore though, because it contains, ham, cheese and egg (not very vegan right). Now, I suddenly thought.. why don’t I make a vegan version?! I did and omg, I mastered it! It is the exact same taste and structure experience, but without any cruelty involved. I need to share this with you. All Dutch people will know about this ‘Broodje Gezond’, but even if you’ve never heard of it, please try it! It’s the best combination.
 BG SANDWICH
 A few months ago I was in the Netherlands for the birthday party of my grandparents. It’s always a busy time when I’m in the Netherlands, because I visit so many people and I like to catch up with everyone. One of the things that was on my list of things to go to was my bother’s new workplace. He started working in a really nice place called Pokespot in Groningen. I went with my sister in law and we had lunch here. You can custom make your own bowl by ticking ingredients on a little menu. This is what I did. I chose all the things I love. Funny enough, when I turned over menu, there was a ready made bowl available with almost exactly all the things I just ticked. The food was so good, I definitely recommend going there when you are in Groningen! I loved it soooo much though, that I decided to recreate the bowl at home. I finally did and I want to share this with you, because I think it’s so delicious, you should try it.
 MANGO POKE
  I always eat my sauerkraut with my salads, but something I also really like for once in a while is this delicious sandwich. I don’t eat bread very often, so this is a real treat. Last Friday I published a recipe on how to make your own sauerkraut. It will go perfectly with this recipe, but if you do not have any on hand (it will take 2 weeks for the sauerkraut to be finished), you can perfectly fine use sauerkraut you bought in the supermarket. The nice thing about this recipe isn’t only that it contains a good dose of protein, a good amount of healthy fats, but also the perfect combination of probiotics (the sauerkraut) and prebiotics (garlic, onion and mushrooms), which makes this a real treat for your gut!
 GUT TREAT
 When I was a child I basically liked all food, except for a very few things. One of those few things was, sauerkraut. In the Netherlands people make a potato dish with is, called ‘stamppot’. I did not like this at all. The sour taste, I just really didn’t enjoy it. Nowadays it’s the food I eat on daily basis. I didn’t eat it for years and years as I knew I didn’t like it, but about half a year ago I tried it again for the beneficial probiotics and I actually really liked it. Especially in a salad or as a topping on a nice sandwich. I now eat it almost every day. Which is super good for my gut. I always buy a big jar in the supermarket, but when
  SAUERKRAUT
 -Put it in a clean jar and push it down as much as you can, so all the cabbage is underneath the juice.
 Macaroni and cheeeeeeese guys! The ultimate comfort food, am I right?! Confession: I think I actually never had macaroni and cheese before I went vegan. I only know that I love the vegan version. So even though it’s hard for me to compare the dairy and this non dairy version, I can tell you that I love this version a lot. It’s so creamy, easy to make (just remember to soak your cashews!) and full of flavour.. Everything you want when you think of good comfort food. So I dare you to try it and tell me if you love it as much as I do. I would love to hear if it hit the spot and if it satisfied your cravings. I served it with a little bit of fresh parsley and extra black pepper. Yum!
 MACASHEW
 Did you have quinoa for breakfast before? It’s not something you will think of as a breakfast, but it’s actually a perfect start of your day. Quinoa is super healthy! It’s high in protein and also contain sufficient amounts of all nine essential amino acids. That is not all, it also contains magnesium, B vitamins, iron, potassium, calcium, phosphorus, vitamin E and it’s high in fiber. Oh and it’s gluten free! I often cook some quinoa in the beginning of the week and keep it in the fridge. This way I can use it in salads etc. during the week, but also for this recipe. Quinoa is actually a seed and it has quite a neutral taste, this is why it’s perfect to enjoy in savoury and sweet dishes. I’m sure that if you’ve had quinoa before, you probably had it for lunch or dinner in a savoury dish, but why not try it like this?
 QUINOA START
  This is the second pasta pesto recipe over here, but everyone likes a good pasta pesto right? ..and this one is so quick and easy. Quick recipes are always welcome I think, especially after a long and hectic day or when you have a whole family to feed. I highly recommend you to make your own pesto though. It really changes the dish. Of course it will be even quicker if you use a ready made pesto (and that is fine too), but if you have the time (or you took the time early in the week), please use a home made one. This transforms a simple pasta dish to something really special. I love using Vivera’s new bacon pieces in here. They are scary good and make such a good combination with the pesto. Btw.. I recommend some extra veggies on the side. It’s yummy with broccoli, green beans or a nice salad perhaps?!
 PASTA PESTO
 A super quick lunch dish.. wraps! Wraps are easy, super tasty, nutritious, handy to take with you, easy to prep and filling. Perfect for lunch, but they can be enjoyed any time of the day really. I like wraps for lunch though. Especially bean wraps. They are high in protein and what I like about it, is that I can make everything the day before. The next day (and the day after that) I only need to warm up a tortilla wrap and scoop everything on top. You fold it up and it’s ready to go. If you want to take it with you, I advice you to cut it in half just before you will eat it, to prevent everything falling out. I hope you will enjoy these delicious wraps just as much as I do.
 WRAP IT UP
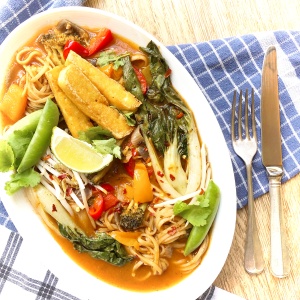 Thai food is probably my favourite food. I love the rich flavours and the creaminess of the coconut. So any Thai curry or soup is very much welcomed by my body. I used to always make curries, but then I thought I could make it in some sort of soup and add noodles instead of rice. So I experimented a bit and this is the result. I loveeeee this recipe! To make it easier, I used a red curry paste. Make sure to use a vegan curry paste. A lot of brands use fish sauce. I used Thai Taste Red Curry Paste. It’s my favourite and it’s 100% vegan. You can make the soup the way you like it best: I used wholewheat noodles, for some extra protein, but you can also use rice noodles if you prefer. I fried the tofu, but a healthier option is to not fry it. You can then just add the tofu at the same time you add the spring onions. To make it spicer, add some chilli flakes. No matter what you prefer, I’m sure you will love it!
 THAI THE NOODLE