
 One of may favourite dishes to make.. or actually, one of my favourite dishes to eat, is lasagna! I find it so handy to make a big oven dish and eat from it a few times. This also makes it a perfect family recipe. It’s even quite fun to do it with kids, building up the different layers.
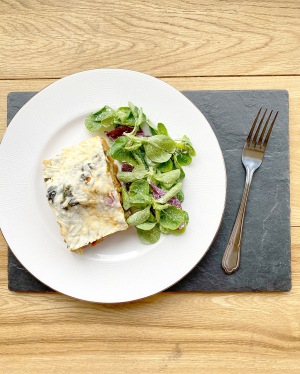
I always eat my lasagna with a very simple salad; literally just lettuce and little bit of mayo as a dressing. The combination of lasagna and salad is just soooo good! I highly recommend you try it too. It’s quite silly that I never put this classic lasagna recipe on my blog before, because I’ve send similar recipes to several people over the years. Better late than never right! I hope you will enjoy it!
 CLASSAGNA
Serves: 3-4 people
1 bag pb grated cheese (I used Sheese)
6 lasagna sheets
1 big red onion (medium chop)
4 cloves of garlic (minced)
250 gr mushrooms (medium chop)
1/2 head of broccoli (medium chop)
300 gr frozen spinach (defrosted)
1 courgette (sliced in length)
2 cans chopped tomatoes
Small hand of fresh basil (chopped)
2-4 tbs nutritional yeast
1 cube of veggie stock
1 tsp onion granules
1/2 tsp garlic powder
1/2 tsp smoked paprika
Salt/Pepper (to taste)
Oil for frying (or water!)
I used an 20×30 cm oven dish.
-Preheat the oven at 200C.
-Fry the onion, 1/3 of the garlic, the broccoli and a big pinch of salt for about 5 min on a high.
-Add the mushrooms and fry all together for 3 min.
-Pour both cans of chopped tomatoes with the veggies and as soon as it start bubbling, turn the heat to medium and add the stock.
-Mix until the stock is dissolved and then add the rest of the garlic, salt and pepper to taste, the nutritional yeast and the basil. Mix again.
-Divide a little layer of the sauce in the bottom of your oven dish and put the lasagna sheets on top. Do another layer of sauce + sheets + sauce.
-Divide the courgette slices on top of the layer of sauce and add the last little bit of sauce over the courgette.
-Squeeze as much water from the spinach as you can and divide it over the courgette/sauce, before you divide all the cheese on top.
-Put it in the middle of the oven for 40-45 min.
Tips: To make it an all vegetable lasagna, you could replace the lasagna sheets by courgette sheets. Be creative and add another layer of cheese somewhere in the middle or a layer of sliced tomatoes. Instead of plant-based grated cheese, you could also use a home made cashew sauce for on the top, like I’ve did with the Tagliaca pasta dish.
Please let me know if you will make this recipe. Or even better, show me! You can tell me down below or show me via Instagram, by tagging @FreedomEvermore. Thank you! X
 I often make this pasta dish for the kids from work. In the beginning they said they didn’t like it, because it was too green. But I called it Hulk pasta, told them not te eat it, because I didn’t want them turn into Hulk and all of a sudden they loved it. One day, when they watched me making it, they did ask me: ‘Lisa, why are you putting a smoothie in the pasta?’. Haha! A few times I posted it on my Instagram Story and many asked for the recipe. I procrastinated it for a while, but I thought Earth Day is a good reason to post such a green and tasty recipe. Whenever I make it for the kids I always make a bit more, because I also like to eat this myself. It’s so creamy and delicious. What makes it a great family recipe!
 HULK PASTA
 Macaroni and cheeeeeeese guys! The ultimate comfort food, am I right?! Confession: I think I actually never had macaroni and cheese before I went vegan. I only know that I love the vegan version. So even though it’s hard for me to compare the dairy and this non dairy version, I can tell you that I love this version a lot. It’s so creamy, easy to make (just remember to soak your cashews!) and full of flavour.. Everything you want when you think of good comfort food. So I dare you to try it and tell me if you love it as much as I do. I would love to hear if it hit the spot and if it satisfied your cravings. I served it with a little bit of fresh parsley and extra black pepper. Yum!
 MACASHEW
 This is the second pasta pesto recipe over here, but everyone likes a good pasta pesto right? ..and this one is so quick and easy. Quick recipes are always welcome I think, especially after a long and hectic day or when you have a whole family to feed. I highly recommend you to make your own pesto though. It really changes the dish. Of course it will be even quicker if you use a ready made pesto (and that is fine too), but if you have the time (or you took the time early in the week), please use a home made one. This transforms a simple pasta dish to something really special. I love using Vivera’s new bacon pieces in here. They are scary good and make such a good combination with the pesto. Btw.. I recommend some extra veggies on the side. It’s yummy with broccoli, green beans or a nice salad perhaps?!
 PASTA PESTO
 Who doesn’t like pasta pesto! It’s such an easy, quick dish. And perfect for families too, because kids mostly love it too. Of course you can just mix some pesto with some pasta, but you can also make it a little more special and even tastier. It’ll still be easy though, just more fancy. You might want to leave the chilli flakes out if you want to serve it to children. Also humous is optional. I like the creaminess, but you might not or you want to leave those extra calories out. If you like to add some extra protein, then you can add some chickpeas (or some beans). I also like to sneak some sun-dried tomatoes in there.. you decide! Enjoy!
 PESTO PLENTY
 This is one of my most satisfying recipes. Pesto is something you can use in so many dishes, fresh herbs are super healthy and you can adapt the recipe the way you want it. You can add a little bit more garlic, lemon juice or oil.. whatever you prefer or you can just leave it the way it is. I like it the best like this, it’s the right balance for me. I love to make pasta pesto with it, add it on a pizza, a sandwich, mix it into some mayonnaise or use it as a dip. You can toast the pine nuts and the walnuts for some extra flavour, but you can also just use them straight from the packet. After making it you can keep it in the fridge for a few days.
 GREENERY